In this podcast, Brett Rogenski, General Manager of N.E.T.R., Inc. talks with John Maher about ductless ceiling cassette installation. He covers the installation process and explains what homeowners should expect if they want ceiling cassettes with their ductless heating and cooling systems.
John Maher: Hi, I’m John Maher. I’m here today with Brett Rogenski, General Manager of N.E.T.R., Inc. Heating and cooling company in Massachusetts with a focus on Mitsubishi ductless heating and cooling products. Today, we’re talking about ductless ceiling cassette installation. Welcome, Brett.
Brett Rogenski: Thank you, John. I appreciate you having me.
What Is a Ductless Ceiling Cassette and Where Can It Be Installed?
John: Sure. So Brett, what is a ductless ceiling cassette and where can it be installed in a home?
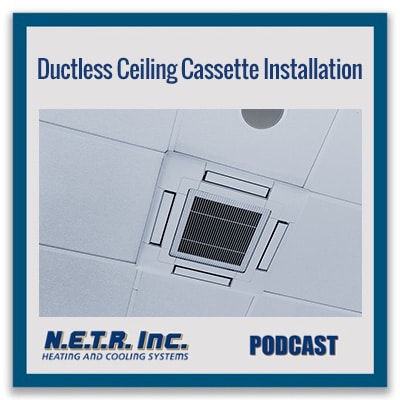
Brett: Sure. Great question. A ductless ceiling cassette functionally works the same way as all other ductless items such as wall mounted or floor mounted items. It is a unit and evaporator that is mounted into the ceiling. So all the functional parts are recessed into the ceiling, as well as the refrigerant line connections, etcetera.
And where can it be put? It can be put on a second floor where there’s an attic above quite easily and on the first floor, depending on construction type. It can also be put there, basically wedged between your first floor ceiling and your second floor floor, and allowing us to hide that away up in your ceiling.
Different Types of Ceiling Cassettes
John: Okay. And what are the different types of ductless ceiling cassettes that are available and what are maybe some of the differences in terms of installing those?
Brett: Sure. There’s two primary flavors and it’s really a form factor thing. So the first one is there’s a, what’s called a two way cassette, which basically means it distributes air in two directions at the same time. And those are kind of long and rectangular. They’re about 15 inches wide by 43 inches long. And they’re designed to fit between your ceiling, between your rafters and floor joists and recess in there because typical construction is 16 inches apart on those things. So, it’s kind of long, long and rectangular, recesses up into the ceiling and distributes air in two directions.
And then the second one is a square. So it’s two foot by two foot. So it’s 24 inches by 24 inches. And it actually dissipates air in four directions simultaneously. So it takes that conditioned air going out in four directions simultaneously. And those require a little more work because again, with typical construction being 16 inches between joists and rafters, we actually have to work with the homeowner, bring in a carpenter and actually build out a box that is in the ceiling.
So we cut a hole and then he would frame in a box that this would mount into. And then that allows it to keep the structural integrity of the home because we’ve had to cut those joists. So by building that box, we can now have a space to put that in, and it’s still supporting those rafters and supporting those joists.
Construction Required to Install a Ductless Mini-Split
John: Okay. Maybe talk a little bit more about that construction that needs to be done to install a mini-split ceiling cassette. Now with the longer narrower type, the rectangular type, like you said, you don’t have to do any cutting of the ceiling rafters or anything like that. All you’re doing is cutting sheetrock in that case, right, and then it just fits right up in between the rafters. So it’s only the sheetrock that you’re cutting for that first style.
Brett: Correct. So, occasionally we have to push on some rafters a little bit, maybe shave them slightly because they might not be perfectly 16 inches. But yeah, largely the bulk of what we’re doing is we are finding the appropriate spot with the homeowner where they would like that mounted and that we can accommodate it. And we’re really just cutting the sheetrock off their ceiling, recessing that unit up and fitting it snug right between those two rafters and then all the mechanical parts of it and the refrigeration lines, etcetera, are now above the ceiling. And all they see is a grill on their ceiling and all the rest of it’s recessed up into that ceiling, up into that attic.
Again, with the two foot by two foot model, the square model, that’s going to require a bit more actual construction. So again, we are going to be cutting that ceiling, cutting that sheetrock, but to accommodate that in most cases, you’re also having to cut a floor joist, cut a rafter, and again, have a box built out that then soundly allows the accommodation of the unit and also supports those things. So everything we do we make sure leaves the homeowner in a great position.
John: Right. So when you’re cutting the ceiling rafters like that, obviously those are important, that they’re a structural part of the house and they’re keeping the roof up and that sort of thing.
Brett: Of course.
Process of Installing a 24×24 Ceiling Cassette
John: You might not be a carpenter yourself, but can you describe the process of that? Do you have to put like poles up in the room to like support the ceiling joist as you cut them and make sure they don’t fall down or something like that,? Or what’s involved in the process of that?
Brett: Sure. It’s really not all that complicated. The first thing that we do once we’ve established the location with the homeowner and the direction that the rafters are running. The direction the rafters are running is going to determine the direction we can bring our refrigerant lines in from the outside of the house. So we have to go with the rafters, okay, so that void between them.
So we establish what direction. We then establish where they would like it with the homeowner, relative to that direction, that we can feed refrigerant lines and drain lines. Then we actually mark out that, once we’ve established what’s physically possible. We mark out that 24 by 24 spot. We remove the sheetrock at that point. And then what we do, we don’t need to prop anything up, nothing like that. This is very short term. We then have the carpenter come in. And he assesses that, let’s say it’s a floor joist or a ceiling rafter, whatever it is. He actually is usually only cutting one.
And then within that, he is actually creating a box. So where he cut that one rafter, he’s now going across from the rafter to its left to the rafter to its right, and bringing a board across there of the same size. And then now tying the one that has been cut back into that board that he’s now added across there. And same thing on the backside. So he’s gone from having these long skinny bays, if you will, that we’ve all seen in our attics to creating a square box in the middle of that, where all the rafters are supported on all sides.
John: I see. Yeah. So the rafter that gets cut ends up getting nailed to, if you will, with this sort of cross beam. It gets nailed to the rafters that are next to it. And so it ends up being sort of the rafter boards that are next to the one that’s cut that are really supporting the weight of that middle rafter.
Brett: That’s correct. Exactly. It helps transfer that weight it moves on. And it’s a pretty standard building practice. It’s not a lot different than the access hole that goes up into your attic. If you were to go up and look at that, typically that’s been cut through a rafter, and again, framed around it to be able to support that properly.
John: Okay. Sure. Or on a wall, they do the same thing when they, for windows and doors. Right?
Brett: Precisely. It’s almost as if you were framing for a window in your ceiling.
Do Ceiling Cassettes Need Ducts?
John: So now does a ceiling cassette require ducts of some kind to go in the attic? Or is it a true ductless system where you’re just running refrigerant lines and things like that back and forth?
Brett: Yeah. It’s a true ductless system. So it’s just in a little different form factor than most people are used to seeing. So it’s a true ductless system. So the only things going to and from that unit are refrigerant lines. So our insulated refrigerant lines, suction lines, drain lines for the condensate, which then has to be, there’s a little pump that’s built into that unit. So the condensation collects in a little pan and is then pumped out through the drain lines and it then exits the house there. And of course, power as well, which it’s powered by our unit as well.
So, yeah, it’s a true ductless solution. It’s really everything that goes to it is no different than what would go to a wall or a floor unit. It’s just housed up in your ceiling between some rafters or joists.
Planning the Installation of a Ductless Ceiling Cassette
John: So can you take us kind of through the step by step process of installing a ductless ceiling cassette from the point where the homeowner and you are deciding that you really want to have a ceiling cassette in the room. How do you determine where that should go, where it’s capable of being placed in the room, all the way through the finished installed product.
Brett: Yeah. Great question. So, the first thing that we’re going to do once a homeowner has established that this is the solution that they would like to have. We’re going to try, well, number one, aesthetically, work with them. Okay. In an optimal situation, where would you like this to be? So they’re going to point to a spot on the ceiling.
The next thing we’re going to establish is what direction do these rafters run? Okay. Are they going left or right? Are they going from the front of your house to the back? Are they going side to side? Where are we at in the construction of your home? So we’re going to take a look. We’re going to get up above that ceiling and look.
If it’s on a second floor and we can get into the attic, we’re going to go up and see what direction everything is running. That’s going to be pretty easy. If it’s on the first floor, frequently what we have to do is… maybe you have a recessed light. We’re going to slide that recessed light out and that’s going to tell us what direction rafters are running, or floor joists are running. If not, we may have to cut a small access hole somewhere, which would then be repaired, to establish, again, the direction. Because we have to run the same direction as those rafters and those joints. We can’t go across them. We can’t go through there.
So they’d establish where they would like it optimally. We’d figure out where the rafters are running. The next thing we’d do is once we know where the rafters are running and spacing, we could actually say, okay, Mr. Homeowner, maybe we need to slide over here a little bit, slide over there a little bit to accommodate it and determine exactly where.
And then at the time of installation, again, if it’s one of those rectangular units, it’s just going to be, the sheetrock is cut. That unit is slid up into that hole in the sheetrock, secured to the rafters that are on either side of it. And then we’re going to continue to work on our mechanical stuff beyond there. Or we’re going to connect our refrigerant lines, run them the same direction as the rafters. And then out through the exterior wall, down the side of the home in linehide. And that would house the refrigerant lines, the drain lines, the power.
If we were doing the square model, the first thing we do is, again, establish where we would like this. We would establish what direction our rafters or joists are running. Figure out where we could create that frame with the customer and establish them. So again, they may want to be dead in the center of the room. Well, there might be reasons that we couldn’t get there. Some existing infrastructure, or maybe the way the home is framed. But we can then say, okay, we can’t do it right there. But we can do it over here. Pretty close. Okay. Great.
Then it’s really, the next steps in that, at the time of installation, are cutting that sheetrock to expose those rafters, having the carpenter do his work, where he cuts those things and creates that box. And then very similar from that point on, now we’re traveling within those rafters from the outside of the house to the inside of the house with refrigerant lines, drain lines and power. And connecting them inside that box that is created.
How Do Ductless Ceiling Cassettes Connect to an Outdoor Condenser Unit?
John: Right. Because all of these ductless ceiling cassette units still require an outdoor condenser unit that it connects to. So you have to be able to run those lines across the ceiling, to the outside of the home, and then down the outside of the home to the outside unit.
Brett: Absolutely. Yeah. They connect the same way. Just a different look, but it functionally works very much the way a wall unit would, but it just has a much different aesthetic.
John: All right. Well, that’s really great information. Thanks for talking to me today, Brett, about ductless cassette installation.
Contact NETR to Talk About Ductless Heating and Cooling
Brett: All right. Thank you for having me.
John: And for more information, you can visit the N.E.T.R. website at netrinc.com or call (781)-933-NETR. That’s (781)-933-6387.